Here’s the deal: Listings with professional-quality photos sell 32% faster, attract 61% more views, and can add up to $11,200 to the sale price. Whether it’s stunning twilight shots, HDR interiors, or drone photography, showcasing key features effectively in your property photography is crucial in today’s competitive real estate market.
Quick Overview of the 10 Tips:
- Twilight Photos: Highlight exteriors during dusk for a warm, inviting glow.
- HDR Photography: Capture crisp interior details in all lighting conditions.
- Room Staging: Declutter and arrange furniture to make spaces feel larger and more appealing.
- Wide-Angle Shots: Show off room layouts without distorting proportions.
- Proper Lighting: Use natural and artificial light to brighten spaces.
- Close-Up Details: Zoom in on premium materials and finishes.
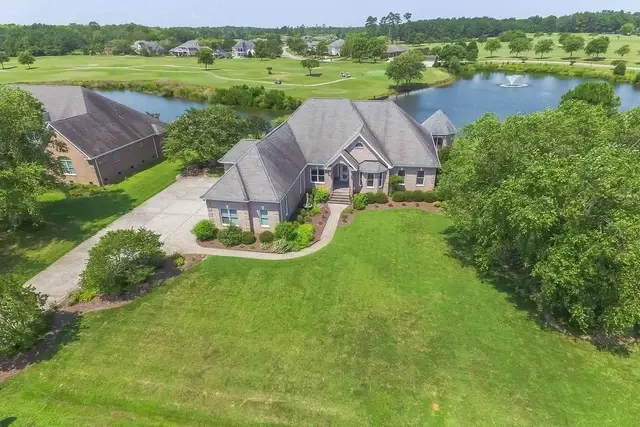
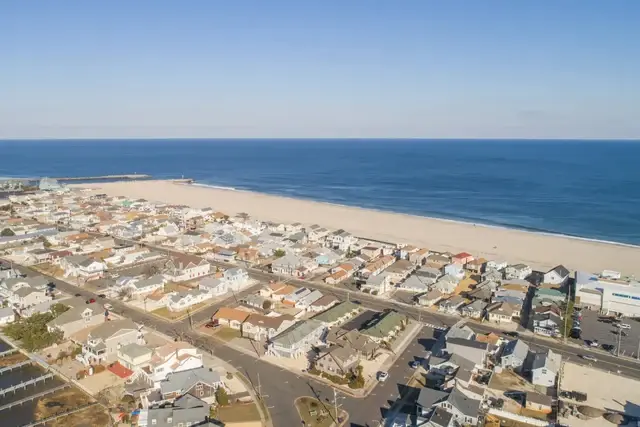
- Drone Photos: Showcase large properties, outdoor features, and unique perspectives.
- Photo Editing: Balance lighting, correct colors, and remove distractions for polished images.
- Virtual Tours: Create immersive 3D walkthroughs to engage buyers.
- Logical Photo Order: Arrange images to guide buyers through the property seamlessly.
10 Top Real Estate Photography Tips!
1. Use Twilight Photos for Better Exteriors
Twilight photos can increase a property's visibility by a whopping 76% . These images beautifully showcase exteriors, with the glow of interior lighting spilling through windows against the backdrop of a dusky sky. It's no surprise that 59% of twilight shots are used for homes priced at $500,000 and above .
"The soft warm light, combined with twinkling lights from the house and surrounding area, creates a stunning visual effect to draw attention." - ShowingTime+ Team
If you're aiming for that perfect twilight shot, here are some expert tips to keep in mind:
- Turn on all interior and exterior lights: This creates a warm, inviting glow .
- Open blinds and remove window coverings: Let the interior lighting shine through .
- Use the right equipment: A sturdy tripod is essential for sharp, clear photos during longer exposures .
Twilight photography isn't just about the house - it’s also a fantastic way to highlight outdoor features like pools, patios, or landscaping. The combination of artificial lighting and the natural glow of dusk adds depth and makes these spaces more attractive. Considering that 97% of buyers start their search online , a striking twilight photo can make all the difference.
Twilight shots have a way of forming an emotional connection with viewers. Up next, learn how HDR photography can bring interior details into sharper focus.
2. Take HDR Photos for Clear Indoor Shots
High Dynamic Range (HDR) photography is a game-changer for capturing interiors with both bright and shadowed areas. By blending multiple exposures, this technique ensures every detail - whether bathed in sunlight or tucked in the shadows - stands out clearly. It’s an excellent way to highlight a property’s interior features.
Here’s what you’ll need to get started:
- A DSLR camera set to aperture priority mode (F7.1–11)
- A sturdy tripod to keep everything steady
- An ISO setting of 100 to minimize noise
Mastering bracketing is key to HDR photography. Capture five exposures spaced three stops apart to cover the full range of lighting conditions .
Recommended Camera Settings for HDR
| Camera Setting | Recommended Value | Purpose |
|---|---|---|
| Format | RAW | Allows greater flexibility during editing |
| Aperture | F/8 | Ensures optimal depth of field |
| ISO | 100 | Reduces noise for clean images |
| Bracketing | 5 shots, 3-stop intervals | Covers the entire light range |
When editing your HDR photos, aim for a natural look. Over-editing can make rooms appear artificial and unappealing. The goal is to showcase the property’s features accurately while ensuring every detail is visible.
HDR photography works particularly well in spaces like:
- Kitchens with reflective surfaces like stainless steel and glossy countertops
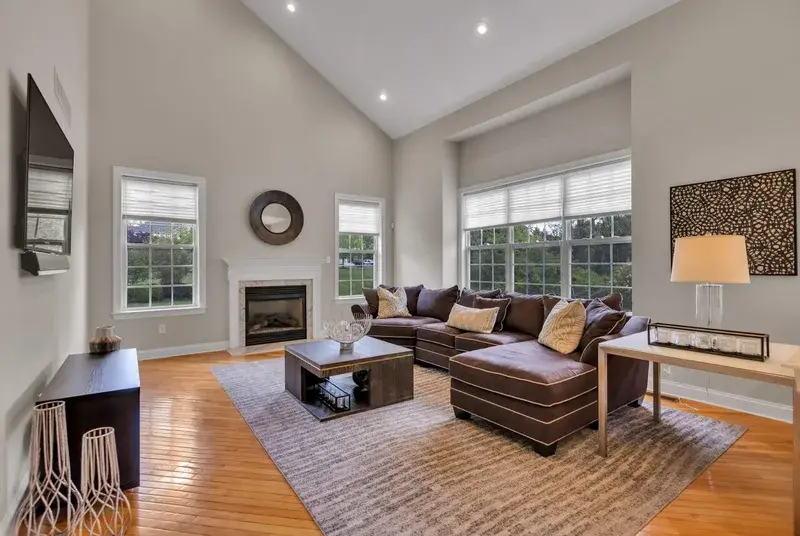
- Living rooms with large windows and varying light levels
- Bathrooms that combine natural and artificial lighting
- Finished basements where achieving balanced lighting is crucial
For those who need professional results quickly, companies like HomeJab offer on-demand HDR photography with a 24-hour turnaround, ensuring your property listing stands out.
While HDR is fantastic for highlighting interior details, it’s just one piece of the puzzle. Next up, we’ll look at how proper room staging can take your photos to the next level.
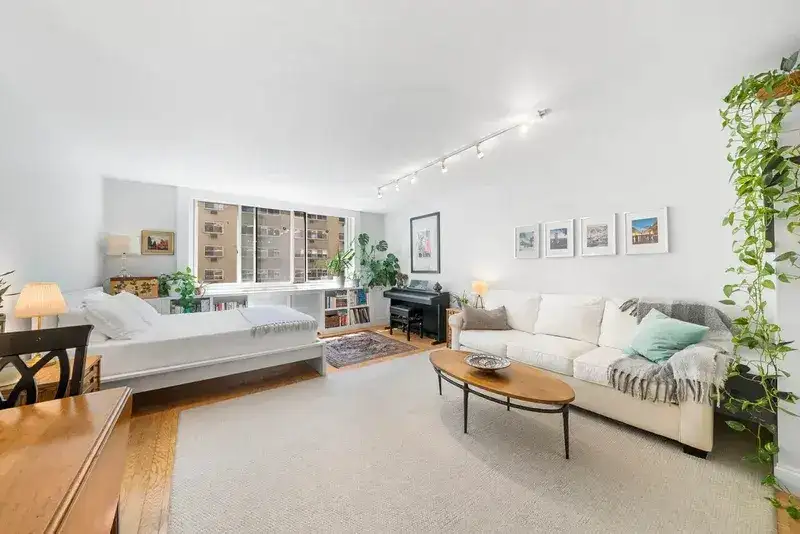
3. Stage Rooms to Show Space
Staging rooms is all about presenting a home in its best light - literally and figuratively. By decluttering and arranging spaces thoughtfully, you not only highlight a property's standout features but also help potential buyers envision themselves living there. It’s a simple yet powerful way to make rooms feel more spacious and inviting.
Essential Staging Principles
The cornerstone of staging is creating a neutral and welcoming environment. Start by clearing surfaces of clutter and removing personal items to give the space a blank slate feel . Furniture placement also plays a huge role. Instead of pushing everything against walls, arrange furniture to define areas naturally - like creating cozy conversation spots - while leaving clear walkways .
Room-Specific Staging Guidelines
Each room tells its own story, so tailoring your staging efforts is key. Here’s a quick guide to what works - and what doesn’t:
| Room Type | Key Staging Elements | What to Avoid |
|---|---|---|
| Living Room | Arrange seating for conversation, add minimal accessories, use side lighting | Overly dominant features |
| Kitchen | Keep counters clear, add a simple centerpiece on the island | Clutter from small appliances |
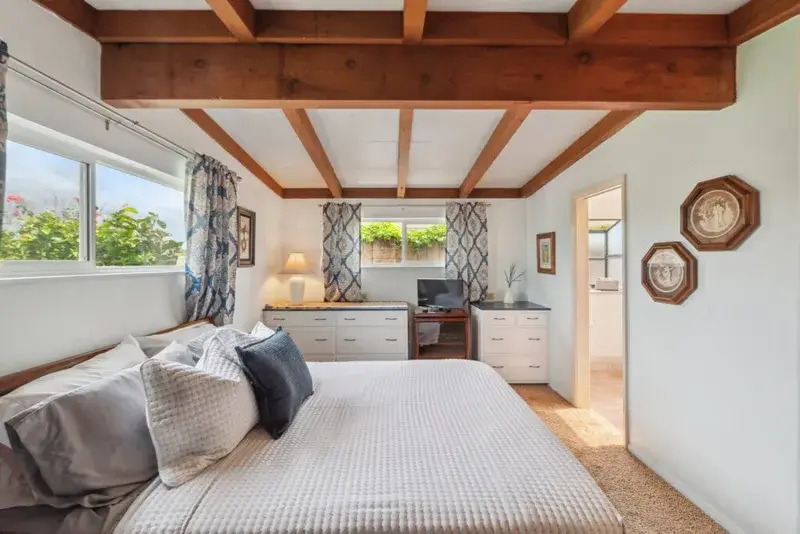
| Bedroom | Use balanced nightstands, layer textured bedding | Overcrowded surfaces |
| Bathroom | Display fresh towels, open shower curtains | Excess personal care items |
| Home Office | Keep the desk clean with minimal accessories | Piles of paperwork |
Maximizing Space Through Light
Lighting can completely transform how a room feels. Start by removing heavy drapes or blinds that block natural light. Turn on every available light to brighten the space and eliminate shadows that might make a room feel smaller . For areas lacking natural light, try these tricks:
- Add mirrors to reflect light and create a sense of depth.
- Opt for glass or lucite furniture to keep the space feeling open.
- Stick to light, neutral colors for walls and decor.
- Use extra lighting, like floor lamps or table lamps, to brighten dark corners .
When the physical setup still doesn’t achieve the desired effect, there are other options to consider.
Virtual Staging Solutions
If physical staging and lighting adjustments don’t quite cut it, virtual staging can step in as a game-changer. This service digitally enhances images, showcasing spaces in their best possible form while staying true to reality. Companies like HomeJab offer virtual staging alongside professional property photography, making sure every room leaves a lasting impression.
4. Use Wide-Angle Shots Correctly
Wide-angle photography is perfect for capturing expansive views while keeping the space looking natural. The key is balancing wide coverage with an accurate representation of the area to avoid any visual distortion.
Selecting the Right Equipment
For property photography, lenses with focal lengths between 14mm and 24mm are often the go-to choice . This range allows photographers to capture broad scenes without sacrificing the natural proportions of the space, giving potential buyers a realistic sense of the property.
Positioning and Technique
Getting wide-angle shots right involves more than just the lens - it’s about where and how you position the camera. Here’s a quick guide:
| Aspect | Best Practice | Common Mistakes |
|---|---|---|
| Camera Position | Place the camera in a corner or doorway | Positioning it in the center, which limits the view |
| Camera Level | Keep the camera level | Tilting the camera, which distorts the perspective |
| Composition | Highlight the layout and connections | Cutting off essential architectural elements |
Strategic Applications
Wide-angle lenses are particularly effective in certain scenarios:
- Large Living Areas: Show off the seamless flow between living, dining, and kitchen spaces .
- Outdoor Views: Highlight features like spacious backyards, swimming pools, or landscaped areas .
- Room Connections: Emphasize how different rooms and spaces relate to one another .
Using these techniques ensures that wide-angle shots serve their purpose - showcasing the property in the best possible light.
Professional Execution
When done right, wide-angle photography provides a clear and accurate view of the property’s layout. For example, HomeJab’s photographers rely on high-quality equipment and expert techniques to capture images that resonate with serious buyers. Their attention to detail ensures every shot tells the story of the home effectively.
5. Set Up Proper Room Lighting
Good lighting can make or break property photography. Listings with well-lit photos sell 32% faster and can even fetch up to $11,000 more on average compared to those with ordinary images . Start by taking full advantage of natural light, then enhance it with artificial sources as needed.
Natural Light Optimization
The best time to capture interiors is during the "golden hours" - shortly after sunrise or just before sunset. These times offer soft, diffused sunlight that creates even lighting without harsh shadows . Here’s how to make the most of natural light:
| Time of Day | Action | Purpose |
|---|---|---|
| Morning/Evening | Open curtains and blinds | Allow soft, natural light |
| Midday | Use sheer curtains | Soften harsh sunlight |
| Overcast Days | Add artificial lighting | Maintain brightness |
By working with the light you have, you can create a warm and inviting atmosphere that appeals to potential buyers.
Artificial Lighting Techniques
When natural light isn’t enough, artificial lighting steps in to save the day. Professional photographers often rely on daylight-balanced bulbs (around 5000K) to maintain a consistent color tone throughout the home . Proper artificial lighting can make rooms feel larger, cleaner, and more welcoming .
Here are some go-to techniques:
- Portable LED Panels: Perfect for brightening dark corners and eliminating shadows.
- Under-Cabinet Lighting: Great for showcasing kitchen spaces and adding depth.
- Accent Lighting: Highlights unique features like crown molding or built-in shelves .
Advanced Lighting Solutions
For truly standout photos, professionals often combine multiple lighting tools and techniques:
- LED Panels: These portable lights can brighten tricky areas.
- Specialized Fixtures: Highlight key architectural details or unique design elements.
- Reflectors: Bounce light to fill in shadows and create a balanced look.
Professional Execution
A recent survey revealed that 83% of home buyers consider well-lit photos a major factor when deciding to view a property . Professional photographers achieve stunning results by carefully blending natural and artificial light while avoiding common mistakes, like overusing overhead lights or creating unwanted reflections in mirrors and windows .
For spaces with limited windows or on gloomy days, advanced equipment and expertise are critical. Partnering with experienced services like HomeJab ensures that every room shines. These professionals use cutting-edge techniques to highlight a property’s best features, making it more appealing to potential buyers.
6. Take Close-up Photos of Features
Once you've nailed staging and lighting, it’s time to zoom in - literally - on the details that make a property stand out. Close-up shots bring the unique features of a home into focus, showcasing the craftsmanship and quality that can justify a higher price tag .
Priority Features to Capture
When planning your detailed shots, aim to highlight elements that reflect superior quality and attention to detail. Here are some key areas to focus on:
| Feature Category | What to Highlight | Why It Matters |
|---|---|---|
| Kitchen | Custom cabinetry, stone countertops, high-end appliances | Highlights premium finishes and impeccable build quality |
| Bathrooms | Designer fixtures, custom tilework, premium finishes | Reflects thoughtful design and attention to detail |
| Architecture | Crown molding, wainscoting, built-ins | Showcases refined craftsmanship |
| Materials | Natural stone, hardwood grain, custom metalwork | Underscores the use of luxurious materials |
Technical Considerations
To truly capture the essence of these details, using the right gear and techniques is essential. A macro lens is perfect for highlighting intricate textures and finishes . For bathroom shots, ensure every surface is spotless and shiny - cleanliness amplifies the appeal of these spaces .
Why Close-ups Matter
As agentfire.com points out, close-up images tell a story about the property’s quality and craftsmanship. These visuals are a powerful way to communicate value, allowing potential buyers to see and appreciate the finer details .
Tips for Professional Results
When shooting close-ups, keep these tips in mind for polished, professional results:
- Focus sharply on the subject to ensure every detail is crisp.
- Use a shallow depth of field to make the feature stand out against the background.
- Light the area effectively to highlight textures and materials.
- Clean surfaces thoroughly to present a pristine appearance.
- Frame the shot to draw attention to the craftsmanship of the feature.
Next, we’ll dive into aerial photography techniques to add another layer of perspective to your property shots.
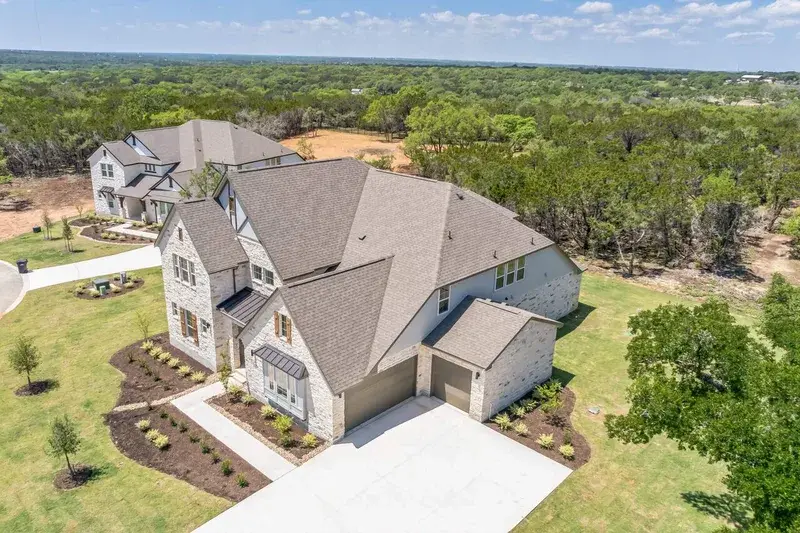
7. Add Drone Photos When Needed
Aerial photography has become a game-changer for property listings. Research shows that using drone photos can speed up the sale process by an impressive 68% . In 2024, 35% of realtors have integrated drone property photography into their marketing strategies, highlighting its growing importance in showcasing properties . These stats make it clear: aerial shots offer a unique way to capture a property's full potential.
When to Use Aerial Photography
Some properties benefit more than others from drone photography. Here's a breakdown:
| Property Type | Key Benefits | What to Capture |
|---|---|---|
| Large Estates | Displays the property's scale and layout | Full property layout, landscaping |
| Waterfront Homes | Emphasizes proximity to water and views | Shoreline, beach access, nearby waters |
| Rural Properties | Highlights acreage and natural features | Boundaries, outbuildings, terrain |
| Luxury Homes | Showcases design and outdoor amenities | Roof details, symmetry, pools, gardens |
Professional Results Matter
If you're considering drone photography, hiring a professional is worth it. Basic packages typically cost between $150 and $300, with more advanced options available for larger or more complex shoots . For example, HomeJab offers packages that include 10-15 high-quality aerial photos and videos, ensuring your property stands out.
Best Practices for Drone Photography
To get the most out of aerial shots, follow these tips:
- Shoot during golden hours: Early morning or late afternoon lighting enhances the visuals .
- Plan your shots: Identify angles that highlight the property's standout features.
- Experiment with elevation: Different heights can reveal new perspectives.
- Include nearby landmarks: Showcase amenities or features that add value to the property.
Impact on Sales
The numbers speak for themselves. Listings with professional drone photography see up to a 73% increase in visibility and a 68% boost in closing rates . Plus, 83% of home sellers prefer working with agents who use drone technology .
"Quality is the business plan." - Devon and Dustin Fox, Fox Homes Team
Drone property photography isn't just about pretty pictures - it’s a proven way to elevate property marketing. By giving potential buyers a complete view of a home, it creates a connection that traditional photos simply can't match.
Up next, discover how to edit these photos for maximum impact.
8. Edit Photos for Best Results
Editing can turn a good photo into a standout image. Research highlights that listings with professionally edited photos tend to sell faster and often at higher prices .
Essential Editing Techniques
The right techniques can make all the difference. Here's how to approach key editing tasks:
| Editing Task | Purpose | Best Practice |
|---|---|---|
| Exposure Balance | Ensure even lighting | Blend multiple exposures for a natural appearance |
| Color Correction | Achieve true-to-life colors | Adjust white balance to reflect the room's tones |
| Lens Correction | Fix distortion and align lines | Straighten verticals, especially in corners |
| Object Removal | Reduce visual distractions | Remove temporary items like cords or reflections |
When shooting, keep your camera settings in mind. An f/8 aperture ensures sharp focus, while Auto Exposure Bracketing (AEB) captures a range of exposures to work with during editing .
Advanced Editing Solutions
Modern tools are reshaping property photography, and AI-powered editing is leading the charge in 2025 . These tools offer features like:
- Automatic sky enhancement to brighten outdoor views
- Smart object removal for cleaner compositions
- Instant color correction for accurate tones
- HDR blending to balance tricky lighting conditions
For a polished finish, services like HomeJab provide professional editing that ensures visual consistency across all your property photos. Their use of HDR blending is particularly effective for spaces with large windows or mixed lighting, delivering a balanced and realistic look.
The Role of Color Grading
Color grading plays a crucial role in shaping how buyers perceive a property. Skilled editors focus on:
- Natural tones: Keeping walls, floors, and furnishings true to their actual colors
- Balanced lighting: Ensuring even illumination throughout the space
- Consistency: Creating a cohesive visual style across all photos
These subtle adjustments help create an inviting and accurate representation of the property.
Common Editing Pitfalls to Avoid
While editing can elevate your photos, overdoing it can backfire. Steer clear of:
- Over-saturating colors, which can make spaces look artificial
- Excessive HDR effects that result in unnatural lighting
- Unrealistic sky replacements that feel out of place
- Altering or removing permanent features of the property
Using tools like Lightroom or Photoshop, focus on subtle, natural improvements. Aim to enhance details without straying from the property's real appearance .
Consistent and realistic edits not only tie your photos together but also help present the property in the best possible light.
9. Create Virtual Property Tours
Virtual tours add a whole new layer to showcasing properties, building on the visual strategies like editing and drone property photography we've already discussed. Here's why they matter: listings with virtual tours can snag up to 87% more views and sell 31% faster than those without. It's a game-changer for standing out in the digital real estate space.
What Makes a Virtual Tour Effective?
To create a virtual tour that truly impresses, certain elements are must-haves:
| Component | Purpose | Best Practice |
|---|---|---|
| 3D Walkthrough | Allows room-to-room navigation | Ensure smooth transitions between spaces |
| Digital Floorplan | Helps visualize the layout | Include measurements in feet and inches |
| Hotspots | Highlights key features | Mark upgraded amenities and custom details |
| Room Labels | Makes navigation easier | Use clear, descriptive names |
How to Optimize Virtual Tour Quality
An effective virtual tour is all about precision and professionalism. Experts like HomeJab use advanced 3D cameras and software to create seamless, polished tours. Here’s what they focus on:
- Natural lighting to make spaces feel warm and inviting
- True-to-life colors that accurately represent the property
- Accurate room proportions to give a realistic sense of space
- Detailed textures that highlight premium finishes like hardwood floors or granite countertops
Adding Interactive Features
Interactive elements can take virtual tours to the next level and keep potential buyers engaged. In fact, over 70% of homebuyers find these tools incredibly helpful. Consider including:
- Measurement tools to help buyers plan furniture placement
- 360-degree views for a complete look at each room
- One-click navigation to move easily between spaces
- Integrated floorplans for better orientation
These features don’t just make tours more engaging - they also make the property feel more accessible and approachable.
Combining Virtual Tours with Professional Photography
When you pair virtual tours with high-quality professional property photography, the results are even better. Using premium photo techniques alongside virtual tours creates a comprehensive presentation that attracts more interest.
Technical Tips for Seamless Tours
For the best user experience, pay attention to these technical details:
- Test loading speeds to ensure quick access across all devices
- Confirm that the tour is mobile-friendly
- Use high-resolution images that scale properly
- Maintain consistent frame rates for a smooth experience
Virtual tours aren’t just a flashy add-on - they're a practical tool for pre-screening buyers. They help serious prospects get a genuine feel for the property, cutting down on unnecessary in-person visits and boosting buyer confidence.
10. Present Photos in Logical Order
Once you've captured and polished your images, the next step is arranging them in a way that creates a seamless virtual tour. The order of your photos isn't just an aesthetic choice - it can make a big difference. Research shows that listings with thoughtfully ordered images can attract up to 60% more views compared to those with random arrangements .
The Best Way to Sequence Your Photos
Think of your photo sequence as a guided, virtual walkthrough of the property. Here's how to structure it:
- Start with Curb Appeal
Lead with a striking exterior shot, ideally taken during the best lighting conditions. This sets the tone and creates a strong first impression.
- Showcase Main Living Areas
Follow with the entryway or foyer, then move into the living room, kitchen, dining area, and primary bedroom. After that, include photos of additional bedrooms, bathrooms, and any standout features, wrapping up with outdoor spaces. This logical flow helps buyers picture themselves moving through the home.
For larger properties, group similar areas together. For example, start with a series of exterior shots, then transition to the interiors, bedrooms, and unique features. This keeps the experience smooth and engaging.
Seasonal and Timing Considerations
Adapting your photos to the time of year can also enhance the listing:
- Update exterior shots to match the current season.
- Separate seasonal photos from the main set to avoid confusion.
- Add dates to your photos for clarity and transparency.
- Focus on indoor features during colder months.
- Highlight outdoor spaces when the weather is ideal.
Technical Tips to Elevate Your Presentation
Experts at HomeJab recommend a few key practices to ensure your photos shine:
- Keep image quality and editing style consistent across all photos.
- Use similar heights and angles when shooting to maintain continuity.
- Include transition shots to show how different spaces connect.
Conclusion
In today's real estate market, property photography has become a powerful mix of technology and creativity, designed to meet the ever-changing expectations of buyers. The numbers don't lie - high-quality visuals can dramatically boost the performance of property listings.
To excel in property photography, mastering a few key techniques is essential:
- HDR Photography: Balances shadows and highlights for interiors that look natural and inviting.
- Strategic Lighting: Combines natural and artificial light to highlight the best features of a space.
- Proper Staging: Creates warm, appealing environments that resonate with potential buyers.
- Aerial Photography: Offers unique perspectives to give context to a property’s location and layout.
- Virtual Tours: Provides immersive, interactive experiences that keep buyers engaged.
The benefits of these techniques are clear, and professional services like HomeJab take it to the next level by offering tools like HDR photography, drone shots, and virtual tours, ensuring every listing stands out.
As technology evolves, property photography is evolving with it. Tools like AI-powered editing, virtual staging, and augmented reality are becoming staples in real estate marketing . These advancements are helping realtors craft listings that are not only visually appealing but also highly informative and engaging.
FAQs
How do virtual tours make property listings more engaging than traditional photos?
Virtual tours offer a dynamic way for potential buyers to experience a property, almost as if they were walking through it in person. Unlike traditional photos, these tours highlight the layout, flow, and how spaces connect, providing a much clearer sense of the home's design and functionality.
They’re especially helpful for reaching buyers who aren’t local. With just a few clicks, anyone can explore the property from anywhere, making it easier to envision living there. This convenience often sparks greater interest and helps buyers make decisions faster and with more confidence.
What are the best ways to use drone photography to highlight a property's unique features?
To make the most of drone photography when highlighting a property's best features, preparation is key. Plan your shots to emphasize standout elements like architectural details, landscaping, and outdoor amenities. Equip yourself with a high-resolution camera - preferably one capable of 4K video - and aim for smooth, steady movements to ensure polished, professional visuals.
Draw attention to special features such as unique roof designs, inviting patios, or sparkling pools by using strategic angles and applying composition techniques like the rule of thirds. Adjust the drone's altitude to capture the property's full scale and surroundings, making sure both the home and its curb appeal are showcased effectively. Well-executed drone photography can elevate your listings and capture the interest of potential buyers.
What makes HDR photography a great choice for capturing interior shots in real estate?
HDR photography works wonders for interior real estate shots by merging multiple exposures into a single, balanced image. This approach brings out the fine details in both brightly lit and shadowed areas, making rooms appear well-lit, vibrant, and natural. The end result? Eye-catching photos that help potential buyers envision themselves in the space.