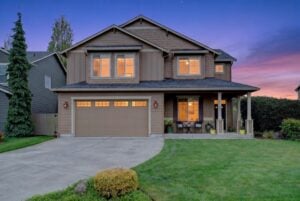
Drone photography is transforming real estate marketing by offering unique, high-angle views that traditional photography can’t achieve. Here’s why it’s effective and how to get started:
- Why Use Drones?
- Highlight property boundaries, layout, and nearby amenities.
- Showcase luxury homes, commercial spaces, and vacant land.
- Impress buyers with detailed aerial visuals in listings.
- What You’ll Need:
- A high-resolution camera drone with stabilization and long battery life.
- FAA Part 107 certification for legal commercial operation.
- Drone insurance to cover liability and equipment damage.
- Key Tips for Success:
- Plan shots to capture the best angles and features.
- Shoot during the Golden Hour for flattering light.
- Edit photos for clarity, color, and perspective.
Using drones can elevate your property listings, attract more buyers, and help you stand out in a competitive market.
Full Drone Real Estate Photography Course (Photo & Video!)
Required Equipment and Legal Guidelines
Before diving into drone photography for real estate, make sure you have the right gear and understand the legal requirements. Here’s a breakdown of the essentials.
Best Drones for Property Photography
When choosing a drone for real estate photography, look for models that deliver high-quality images, steady flight performance, and dependable battery life. Key features to prioritize include:
- High-resolution cameras for capturing sharp photos and videos
- Long flight times to cover entire properties
- Effective stabilization systems for smooth, professional shots
- Obstacle avoidance technology to prevent accidents
- Strong transmission range for uninterrupted operation
- Compact designs for easy transport
Many drones on the market meet these standards. The best choice depends on the type of property you’re photographing, whether it’s a residential home or a commercial building.
FAA Rules and Permits

Using drones for commercial real estate photography means following FAA regulations. Here are the main rules:
- Part 107 Certification: You must pass the FAA Part 107 exam to operate commercially.
- Drone Registration: Any drone over 0.55 lbs must be registered with the FAA.
- Flight Restrictions: Always keep the drone within your line of sight and fly below 400 feet.
- Airspace Authorization: Additional permission is needed to fly in controlled airspace.
Flights should only take place during daylight hours and under safe conditions.
Drone Insurance Requirements
Drone insurance is a must for real estate photography. A good policy will cover damage to your equipment and provide liability protection in case of accidents involving third parties. You might also want to explore professional liability coverage to protect against issues with service quality.
Professional companies like HomeJab ensure compliance by maintaining certifications and insurance, so their aerial photography services are both safe and reliable.
Preparing for Drone Photo Shoots
Property Survey and Key Features
Before you start flying, take time to survey the property. Identify architectural highlights, landscaping details, boundaries, and any potential obstacles like power lines, trees, or nearby structures. Mapping these obstacles helps you plan safe and efficient flight paths. For larger properties, break them into sections to ensure thorough coverage. This groundwork is essential for planning your shots with precision.
Best Times and Weather for Shoots
The timing and weather can make or break your drone photos:
- Lighting: Aim for the Golden Hour (one hour after sunrise or before sunset) or the Blue Hour (about 30 minutes before sunrise or after sunset). These times offer softer, more flattering light. Avoid shooting between 11 AM and 2 PM, when harsh shadows dominate.
- Weather Conditions:
- Light winds to keep your drone steady
- Clear visibility
- No rain or snow
- Minimal cloud cover
Carefully choosing the right time and weather ensures your photos turn out as planned.
Shot Planning Checklist
- Establishing Shots:
- Capture wide aerial views to show the property in its surroundings.
- Always stay within FAA height limits.
- Property Features:
- Shoot from the front, back, and sides to cover all angles.
- Highlight depth, standout features, and key amenities.
- Technical Prep:
- Check battery life, memory space, backup equipment, and emergency landing locations.
- Plan for low-activity times to avoid distractions.
- Use apps to help with sun positioning and angle adjustments.

Taking Professional Aerial Photos
Basic Drone Photo Skills
Start with the basics to capture high-quality aerial shots of properties. Keep your drone movements slow and steady, avoiding sudden turns to ensure smooth footage. Fly higher for wide property views and lower for capturing finer details.
For stable footage:
- Use your drone’s built-in stabilization features
- Make gradual, controlled stick movements
- Try orbit mode for smooth, circular shots
- Practice “point of interest” techniques to focus on key features
Once you’ve mastered stable flying, it’s time to fine-tune your camera settings for the best results.
Camera Settings Guide
Adjusting your camera settings is key to capturing sharp, well-lit images. Use a low ISO and fast shutter speed to minimize noise and motion blur. A moderate aperture strikes a good balance between depth of field and detail. Shooting in both RAW and JPEG formats gives you more options during editing.
Here’s a quick guide:
| Setting | Recommended Value | Purpose |
|---|---|---|
| ISO | 100–400 | Keeps noise low in bright conditions |
| Shutter Speed | Fast (e.g., 1/500+) | Reduces motion blur |
| Aperture | f/4.0–f/5.6 | Balances depth of field and clarity |
| Format | RAW + JPEG | Offers flexibility during post-editing |
| White Balance | Auto or Daylight | Ensures consistent color temperature |
| Focus Mode | Auto with single-point AF | Ensures sharp focus on property features |
Must-Have Property Shots
To showcase a property effectively, capture a variety of angles and perspectives:
- Front Elevation Reveal: Start from a higher position and gradually lower the drone as you approach the property’s front. This technique highlights the building’s scale and curb appeal.
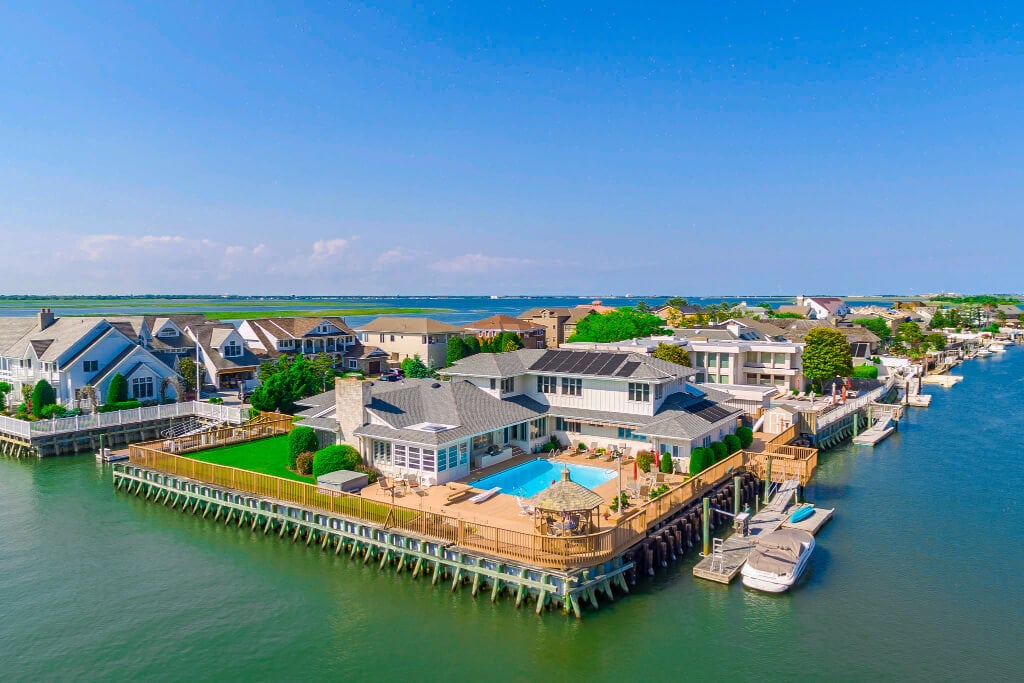
- Bird’s Eye Overview: Take a direct overhead shot to show the full property layout. This view is great for highlighting lot boundaries and how the property fits into its surroundings.
- Angled Perspectives: Capture oblique angles, such as from the corners, to bring out architectural details and create a sense of depth.
- Feature Highlights: Fly closer to showcase unique elements like landscaped gardens, pools, outdoor areas, or standout architectural features.
These shots together create a comprehensive visual story of the property.

Editing and Using Drone Content
Once you’ve taken high-quality aerial images, the next step is editing and strategically using them to enhance property listings.
Photo and Video Editing Tips
Editing aerial footage can make a big difference in how properties are presented. Start with basic adjustments like exposure, contrast, and white balance to ensure a consistent look across all shots. Use lens correction tools to fix distortion from wide-angle drone cameras.
Focus on these key areas when editing real estate aerial content:
- Color correction: Make skies bluer and landscapes greener for a polished look.
- Perspective alignment: Straighten horizon lines and vertical elements for a clean presentation.
- HDR blending: Merge multiple exposures to show bright exteriors and shadowed areas clearly.
- Selective adjustments: Brighten darker areas for better visibility.
- Noise reduction: Minimize graininess in shots taken with higher ISO settings.
Always edit RAW files to retain as much detail as possible. Keep the edits natural to ensure the property is accurately represented. These adjustments will help your aerial content stand out without misrepresenting the property.
Adding Aerial Content to Listings
Placing aerial content thoughtfully in your listings can make a strong impression. Start with a striking aerial shot that highlights the property’s best features, like spacious grounds, a waterfront location, or unique architecture.
Here’s how to organize aerial content effectively:
- Begin with a bird’s-eye view to set the scene and provide context.
- Alternate between ground-level and aerial shots for variety.
- Use both photos and video clips to create a dynamic presentation.
- Add captions to highlight key features visible in the aerial shots.
When uploading to MLS platforms, ensure images are high resolution. Arrange them in a logical sequence that tells the property’s story, starting with the most attention-grabbing aerial views. Once your listing is live, consider how to extend the reach of this content through targeted marketing.
Marketing with Drone Content
Drone footage can be a powerful tool across various marketing channels. Create short video clips for social media that combine aerial views with ground-level tours. Use dramatic aerial shots in brochures and email campaigns to capture attention.
Here are some effective ways to use drone content:
- Social Media: Share 15-30 second aerial highlight reels on platforms like Instagram and Facebook.
- Virtual Tours: Add aerial footage to 3D virtual property tours for a more immersive experience.
- Email Marketing: Include aerial shots in listing announcements and newsletters to grab readers’ attention.
- Property Websites: Use aerial videos as homepage backgrounds to make a strong first impression.
For premium properties, consider creating dedicated aerial photo galleries. Showcase the surrounding area, nearby amenities, and the property’s unique features from multiple angles. This approach helps potential buyers get a complete sense of the property’s location and advantages.
HomeJab‘s Drone Photography Services

With professional drone photography, real estate marketing reaches new heights—thanks to HomeJab’s stunning aerial views that showcase properties in a whole new way.
HomeJab Photography Options
HomeJab provides a range of aerial photography and video services tailored for real estate. Their drone packages include 10–15 high-resolution aerial photos and top-quality video footage, with pricing between $249 and $499. Each session is carefully designed to capture the property’s best features.
These aerial services work seamlessly with HomeJab’s other visual tools:
- HDR photography for vibrant, detailed images
- Walk-through property videos to give buyers a real sense of the space
- 3D virtual tours for interactive online viewing
- Floor plan creation to provide accurate layouts
- Virtual staging to showcase potential designs
- Twilight and virtual dusk edits for dramatic, eye-catching photos
Why Choose HomeJab
HomeJab has built a strong reputation for quality and reliability in real estate drone photography. Since its founding in 2013, the company has developed a network of skilled local photographers specializing in real estate imagery. Their services maintain a 4.8 rating from 865 client reviews, highlighting their commitment to excellence.
“The photos turned out absolutely fantastic – crisp, professional, and beautifully lit. The quality exceeded expectations, and the attention to detail was evident in every shot. The company was incredibly responsive and easy to work with, making scheduling and rescheduling a breeze. I highly recommend their services and would gladly book with them again!” – Liz Zeng [1]
Here’s what sets HomeJab apart:
- Fast turnaround: Get your photos and videos within 24 hours.
- Nationwide availability: Access services anywhere in the U.S.
- 24/7 customer support: Help is always just a call or email away.
- Professional editing: Ensure your visuals are polished and ready to impress.
- MLS integration: Easily upload content to multiple listing services.

How to Book with HomeJab
“Loved the HomeJab app – very easy to use! I also had a great experience working with Derrick; he was professional, friendly, and easy to work with. I received my real estate photos in less than 24 hours, which was amazing! This service is a game-changer for my real estate business. Highly recommend!” – Makenzie Miller [1]
Booking your drone photography session is quick and hassle-free, taking less than two minutes.
Here’s how to book:
- Go to HomeJab’s website or app.
- Pick your preferred aerial photography package.
- Select an appointment time that works for you.
- Enter property access details.
- Complete your booking.
For high-volume clients, HomeJab offers bulk pricing incentives, including a $50 credit for every $1,000 spent. Their customer service team is available 24/7 to answer questions or assist with special requests.
Summary
Drone photography has changed the way real estate marketing works by offering views that traditional photography simply can’t capture. Aerial images provide a broader perspective, showcasing a property’s lot size, nearby amenities, and surrounding landscapes.
HomeJab offers aerial photography packages starting at $249, which include 10–15 high-resolution photos and video. Their services deliver polished content in just 24 hours, thanks to a nationwide network of professional photographers.
To make the most of drone photography in real estate marketing:
- Combine aerial imagery with HDR photos, virtual tours, and floor plans to create a comprehensive property profile.
- Work with professionals who understand real estate needs and comply with FAA regulations.
- Use aerial content across various platforms, including MLS listings and social media.
- Choose services that provide fast turnaround times and tools for seamless marketing.
These strategies help real estate agents enhance property presentations while focusing on what they do best – connecting buyers with homes. Investing in professional drone services can make a big difference in delivering standout results.