
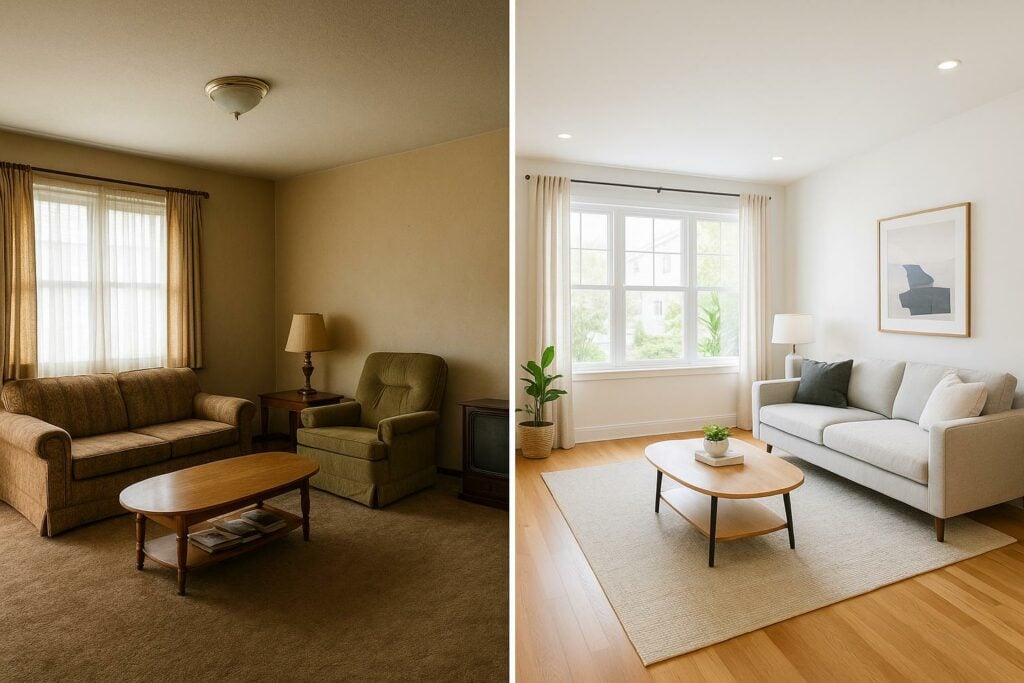
Before-and-after real estate photos are a simple way to show how a property has changed and improved. These comparisons can grab attention, build trust, and help sell properties faster. Here’s what you need to know:
- Why Use Them?
They highlight renovations, justify pricing, and show the quality of upgrades. - Best Times to Use Them:
Major renovations (like kitchens or bathrooms), exterior updates (landscaping, paint), or interior improvements (flooring, lighting). - How to Take Great Photos:
Use consistent angles, proper lighting, and professional editing to align before-and-after shots. - Marketing Tips:
Use these photos in listings, social media, and virtual tours to attract buyers.
A professional photographer, like those from HomeJab, can ensure high-quality results with services like HDR photography, virtual staging, and 3D tours. These visuals help properties stand out and sell quickly.
Property Preparation Steps
Staging Methods
Staging helps showcase a property’s best features through impactful visuals. Both physical and virtual staging can highlight a property’s full appeal.
Here’s a comparison of staging options by area:
| Area | Physical Staging | Virtual Staging |
|---|---|---|
| Living Room | Add accent pillows, throws, and modern art | Digitally place furniture and wall decor |
| Kitchen | Clear counters, add a fresh fruit bowl | Virtually update appliances and add decor |
| Bedrooms | Use crisp bedding and matching decor | Digitally style beds and nightstands |
| Bathrooms | Display fresh towels and quality toiletries | Virtually update fixtures and add accessories |
Virtual staging, like that offered by HomeJab, is a cost-effective way to transform empty rooms into beautifully furnished spaces using digital tools.
Photo Techniques and Editing
Photo Taking Tips
Position your camera about 5 feet high to maintain natural proportions. Use marked tripod spots to ensure consistent angles for all shots.
Recommended camera settings:
- Aperture: f/8 to f/11 for sharper focus across the scene
- ISO: 100–400 to reduce image noise
- Shutter Speed: 1/60 or slower when using a tripod
- White Balance: Manual setting (5500K for daylight conditions)
When framing your photos, include elements like doorways, windows, and built-in features. These make it easier to compare images side by side. Once you’ve captured your shots, move on to refining them with detailed editing.
Photo Editing Steps
Editing is where your images truly come to life. Follow these steps to enhance your photos:
1. Basic Adjustments
Correct lens distortions and chromatic aberrations. Fine-tune exposure, highlights, and shadows to balance the image.
2. HDR Processing
Merge 3–5 exposure brackets to achieve a balanced dynamic range. This is especially helpful for areas with varying light levels, like rooms with large windows.
3. Color Correction
Make selective adjustments to ensure before-and-after images look cohesive:
- Fix any unwanted color casts
- Align white balance between images
- Bring out natural, vibrant colors
Recommended Editing Software
| Software Type | Primary Use | Key Features |
|---|---|---|
| Adobe Lightroom | RAW Processing | Batch edits, presets, lens corrections |
| Adobe Photoshop | Advanced Editing | Layer masks, perspective adjustments, HDR tools |
| Capture One Pro | Color Management | Precise color tools, tethered shooting, live edits |
For best results, use non-destructive editing techniques like adjustment layers and masks. This approach gives you precise control while keeping your original files intact.
HomeJab photographers rely on these methods to create polished before-and-after images that stand out. The result? Eye-catching visuals that make a strong impact in marketing materials.
Marketing with Comparison Photos
Property Listing Optimization
Use clear before-and-after photos to highlight key upgrades in your property listings. Place these comparison shots at the start of your photo gallery to grab attention, and include detailed captions to provide context.
Here’s how to organize your visuals effectively:
- Primary Photos: Showcase the most dramatic transformations.
- Supporting Images: Highlight other notable upgrades.
- Detail Shots: Focus on quality finishes and craftsmanship.
These compelling visuals can also enhance your digital marketing efforts.
Social Media Promotion
Tailor your posts to each platform to maximize engagement. For Instagram, use carousel posts so viewers can swipe through before-and-after images. On Facebook, create albums that group transformation shots by room or renovation type. For LinkedIn, emphasize how the upgrades add value and appeal to the property.
You can also incorporate these visuals into virtual tours for a more immersive experience.
Virtual Tour Integration
HomeJab’s 3D virtual tour technology makes it easy to include comparison photos.
Use interactive hotspots to place comparison points at key areas like the entryway, renovation zones, and finishing details. These hotspots allow viewers to toggle between past and present views, creating an engaging way to showcase the property’s improvements and increased value.
sbb-itb-82c5f45
Professional Photography Services
Professional vs DIY Photography
Professional photography plays a key role in creating compelling before-and-after comparisons. Unlike DIY efforts, professional photographers bring specialized equipment, refined techniques, and an artistic touch to their work. They ensure consistent framing, use proper lighting, and apply advanced HDR methods to achieve balanced exposure. One client shared their experience:
"The photos turned out absolutely fantastic – crisp, professional, and beautifully lit. The quality exceeded expectations, and the attention to detail was evident in every shot. The company was incredibly responsive and easy to work with, making scheduling and rescheduling a breeze. I highly recommend their services and would gladly book with them again."
HomeJab’s services are designed to meet these high standards, ensuring every detail is captured perfectly.
HomeJab Services Overview
HomeJab offers a range of services tailored to showcase properties effectively, with HDR photo packages priced between $229 and $379. These packages include 15–50 enhanced photos delivered within 24 hours. Here’s a breakdown of their offerings:
| Service Type | Features | Turnaround Time |
|---|---|---|
| HDR Photography | 15–50 enhanced photos with optimal exposure | 24 hours |
| Virtual Staging | Virtual furniture placement and design visualization | 24–48 hours |
| Aerial Photography | Drone photos and videos providing a comprehensive view | 24–48 hours |
| 3D Virtual Tours | Interactive walkthroughs highlighting property details | 24–48 hours |
Clients appreciate the platform’s ease of use and efficiency:
"Loved the HomeJab app – very easy to use! I also had a great experience working with Derrick; he was professional, friendly, and easy to work with. I received my real estate photos in less than 24 hours, which was amazing! This service is a game-changer for my real estate business. Highly recommend!"
With a 4.8/5 rating from 904 customer reviews, HomeJab has earned a reputation for reliability. A long-term client noted:
"I’ve been using HomeJab for the past two years across our properties nationwide, and I couldn’t be more impressed. They’re affordable, reliable, and consistently deliver top-notch photos. Their customer service is outstanding – responsive, professional, and always willing to go the extra mile. Every part of this company has exceeded my expectations. I wholeheartedly recommend them – they truly are the best of the best."
These services ensure that every transformation is showcased with precision, enhancing the visual appeal and storytelling of any property.
Real Estate Photo Makeover – Before and After Editing
Summary
Before-and-after photos highlight dramatic property transformations, and professional photography plays a key role in showcasing these changes effectively. By combining proper staging, shooting, and editing techniques, you can create visuals that leave a lasting impression.
Creating impactful before-and-after photos requires careful preparation, consistent shooting, and strategic marketing. HomeJab exemplifies this professional approach, earning a 4.8/5 rating from 904 customer reviews. Their services focus on:
- HDR imaging for balanced lighting
- Accurate frame alignment
- High-quality professional equipment
- 24-hour turnaround time
Techniques like HDR imaging, virtual staging, and aerial photography not only make listings stand out but also help properties sell faster. As emphasized throughout this guide, consistency in preparation and execution is crucial for producing compelling visual comparisons.
"I’ve been using HomeJab for the past two years across our properties nationwide, and I couldn’t be more impressed. They’re affordable, reliable, and consistently deliver top-notch photos. Their customer service is outstanding – responsive, professional, and always willing to go the extra mile. Every part of this company has exceeded my expectations. I wholeheartedly recommend them – they truly are the best of the best."
Professional photography ensures each transformation is presented as a powerful story, from the initial setup to the final presentation. By applying the techniques covered in this guide, real estate professionals can craft before-and-after visuals that connect with potential buyers and drive results.
FAQs
How do before-and-after photos make real estate listings more appealing?
Before-and-after photos are a powerful way to highlight a property’s transformation and improvements, making it more attractive to potential buyers. These visuals allow buyers to see the value added through renovations, staging, or landscaping changes, helping them envision the property’s full potential.
High-quality before-and-after images can make your listing stand out, generate more interest, and potentially lead to faster sales. Professional real estate photography services can ensure these photos are captured and edited to perfection, showcasing every detail in the best light possible.
What’s the difference between physical and virtual staging, and how do you decide which to use?
Physical staging involves furnishing and decorating a property with real furniture and decor to showcase its potential to buyers. It allows prospective buyers to experience the space in person and can create a strong emotional connection. However, it can be costly and time-consuming, as it requires renting furniture and coordinating logistics.
Virtual staging, on the other hand, uses digital technology to add furniture and decor to photos of an empty or sparsely furnished property. It’s a cost-effective and faster option, ideal for marketing listings online. Virtual staging is particularly useful for properties that are vacant or undergoing renovations.
Choose physical staging when you want to enhance in-person showings or open houses. Opt for virtual staging when you need a quicker, more budget-friendly solution to create appealing online listings.
What are the best techniques and tools for editing before-and-after photos to create high-quality, consistent real estate images?
To achieve high-quality and consistent before-and-after real estate photos, focus on a combination of professional editing techniques and reliable tools. Start by using photo editing software like Adobe Photoshop or Lightroom, which allow for precise adjustments in color correction, brightness, contrast, and sharpness. Consistency is key, so apply the same editing presets or workflows across all photos to maintain a uniform look.
For advanced edits, consider tools like HDR blending to balance lighting, and virtual staging to showcase a property’s potential. Pay close attention to details such as straightening lines, removing distractions, and ensuring colors are true-to-life. These techniques help create polished, visually appealing images that captivate potential buyers and enhance your property listings.


