Taking great real estate photos of small interiors is challenging, but the right lighting can make these spaces look bigger and more appealing. Here’s how to handle common problems like shadows, mixed lighting, and reflections, along with the tools and techniques you’ll need:
- Common Issues: Shadows, reflections, mixed light sources, and color casts can ruin photos of tight spaces like bathrooms or hallways.
- Essential Gear:
- Compact lights (speedlights, slim LED panels)
- Tools to soften light (portable softboxes, mini umbrellas)
- Support gear (micro light stands, clamps, reflectors)
- Lighting Setup: Combine natural and artificial light, balance color temperatures, and use diffusers to soften harsh light.
- Camera Settings: Use a wide-angle lens, ISO 100-400, f/8-f/11, and manual white balance to capture sharp, well-lit images.
- Pro Tip: Use HDR photography to balance highlights and shadows, especially in spaces with small windows or reflective surfaces in your real estate photos.
These methods will help you create bright, inviting photos that make small spaces stand out. Whether you’re a DIY enthusiast or working with professionals, good lighting transforms tight interiors into attractive, marketable spaces.
How to Manipulate Light in Small Spaces. A Basic …
Common Lighting Problems in Small Spaces
Small spaces come with lighting challenges that can hurt image quality and require specific fixes.
Limited Space for Equipment
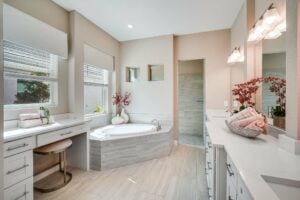
Spaces like bathrooms, closets, or hallways – often under 4 feet wide – make it hard to position lights and modifiers. Mirrors and reflective surfaces add to the difficulty by complicating placement.
Shadow Issues
Deep shadows under cabinets, in corners, or near ceiling fixtures can make these spaces feel even smaller and more cramped.
Mixed Light Sources
Different types of lighting – like tungsten fixtures, daylight from small windows, fluorescents, or under-cabinet LEDs – can clash, leading to uneven color tones.
Reflection and Glare
Mirrors, glass showers, shiny appliances, and polished floors in confined areas can create distracting glare and reflections.
Color Cast Problems
Brightly painted walls, colored tiles, or wood paneling can reflect tinted light, altering the natural colors in the space.
Hot Spots and Exposure
Small windows often cause overexposed highlights next to darker interiors, making it tricky to balance the overall exposure.
Up next, we’ll cover the essential lighting gear you need to handle these challenges in tight spaces.

Required Equipment for Small Spaces
Shooting in tight spaces requires compact tools that deliver professional results. Here’s a breakdown of the gear you’ll need for capturing great real estate photos in confined areas.
Compact Light Sources
Small spaces like bathrooms, closets, or narrow hallways call for compact lighting solutions. Consider these options:
- Speedlights for flexible on- or off-camera flash
- Slim LED panels for steady, continuous light
- Compact strobes for higher light output in small packages
Tools for Softening Light
Direct light can create harsh shadows, especially in tight quarters. Use these accessories to diffuse and soften the light:
- Portable softboxes to spread light evenly
- Mini umbrellas for shoot-through or reflective diffusion
- DIY diffusers like white fabric or foam boards for tricky, tight spots
Support Gear
Proper light placement and stability are essential in cramped settings. These tools can help:
- Micro light stands or tabletop tripods for stable setups
- C-clamps and adjustable arms for mounting lights in tight areas
- Reflectors or bounce boards to fill shadows and balance the light
Once you’ve got the right gear, the next step is figuring out the best way to position it. We’ll cover that in the setup section.
Setting Up Lights in Small Spaces
Position your lights to create a balance between natural and artificial sources.
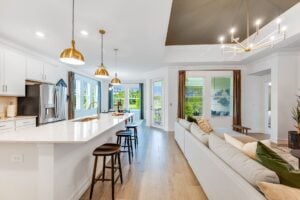
Working with Natural Light
Aim your shots toward windows to take advantage of soft, even light. The best times to shoot are early morning or late afternoon when the sunlight is less intense. Use a sheer curtain to soften harsh rays and a bounce board placed opposite the window to redirect light into shadowed areas.
Adding Artificial Light
- Place your main light, such as a speedlight or LED panel, at a 45° angle and aim it toward the ceiling. This keeps the floor area clear.
- Use a fill light on a micro stand in a corner, setting its output to about half the strength of the main light.
- Add LED strips behind furniture or along baseboards to create depth, especially in rooms without windows. For very small spaces like powder rooms, clamp a speedlight to the doorframe for added illumination.
Handling Multiple Light Types
When combining different light sources, managing color temperature is key:
- Window light: 5500–6500K – set your white balance to Daylight.
- LED panels: 4000–5000K – set a custom white balance around 4500K.
- Speedlights: 5500K – use the Flash white balance setting.
To match warm window light, apply CTO gels to your artificial lights. Set your white balance manually and use manual mode for flashes to ensure consistent output.
Once your lighting setup is balanced, you can move on to fine-tuning your camera settings for small interiors.

Camera Setup for Small Spaces
Once your lights are positioned and their color temperatures are consistent, it’s time to set up your camera for the best results in tight areas.
Switch your camera to manual mode and adjust these settings: ISO 100-400 to keep noise low, f/8-f/11 to ensure a good depth of field, and a shutter speed of 1/60 to 1/125 second when using flash. Set the white balance manually to match your main light source, avoiding unwanted color shifts in reflective surfaces or corners.
For capturing the entire room without distortion, use a 10-16mm wide-angle lens. Mount your camera on a compact tripod at about chest height (around 4 feet). Frame your shots from doorways or corners, tilting the camera slightly downward to emphasize floors and fixtures while reducing visible ceiling space. If the area is especially cramped, take photos from multiple angles and combine the best elements during post-processing.
Up next, we’ll tackle reflections and improve dynamic range using HDR techniques.
Problem-Solving and Pro Tips
HDR Photography
Once reflections are under control, HDR can help balance exposure across the scene. It’s especially useful for managing the harsh contrast often found under cabinets or around bright windows.
Here’s how to handle extreme highlights and deep shadows in small interiors using HDR:
- Set up your camera: Use a tripod and switch to manual mode for stability and consistent settings.
- Bracket your shots: Capture 3-5 exposures at different levels (e.g., –2, 0, +2 EV).
- Merge exposures: Use HDR software with alignment and deghosting features turned on.
- Refine the image:
- Even out highlights and shadows.
- Keep contrasts looking natural.
- Use subtle saturation adjustments.
- Fine-tune the white balance for realistic colors.
Pro tip: If the space has mixed lighting, take extra brackets at ±1 EV. This can help create smoother transitions between bright and dark areas.
Conclusion
Getting the lighting right in small spaces can make a huge difference in your real estate photos. By using the gear, setups, camera settings, and troubleshooting tips shared here, you can bring out depth, texture, and brightness even in the tiniest rooms.
Combine the techniques from Setting Up Lights in Small Spaces and Camera Setup for Small Spaces to create consistent, professional-quality images.
“The photos turned out absolutely fantastic – crisp, professional, and beautifully lit.” [1]
HomeJab‘s network of local photographers offers premium HDR images with a 24-hour turnaround, delivering balanced exposure even in tricky layouts.
Whether you’re taking the DIY route or working with HomeJab’s professionals, these methods will help you make small interiors look open and welcoming. Good lighting can transform tight rooms into spaces that draw in buyers. Let HomeJab’s team help your listings stand out.

FAQs
How can I minimize shadows and reflections when photographing small or tight spaces?
To reduce shadows and reflections in small spaces, start by using soft, diffused lighting. Position a softbox or umbrella light at an angle to evenly illuminate the area without creating harsh shadows. Avoid direct flash, as it can cause strong reflections on shiny surfaces.
You can also use bounce lighting by aiming your light source at a white wall or ceiling to spread light more naturally. For reflective surfaces like mirrors or windows, adjust your shooting angle to minimize glare, and consider using a polarizing filter on your lens to reduce unwanted reflections. These techniques will help create a clean, professional look in your real estate photos.
What’s the best way to combine natural and artificial light for real estate photos in small spaces?
To achieve professional-quality real estate photos in tight interiors, start by leveraging natural light as much as possible. Open curtains or blinds to let in daylight, which provides a soft and even base for your shots. Then, supplement with artificial light to fill in shadows or brighten darker areas. Use portable LED panels or bounce light off walls to avoid harsh shadows and maintain a balanced look.
Position your artificial lights strategically to complement the natural light, aiming for a consistent color temperature. Avoid mixing light sources with drastically different tones (e.g., warm and cool) to prevent color inconsistencies. With the right mix of natural and artificial light, you can create bright, inviting images even in small or awkwardly lit spaces.
What are the best camera settings for photographing small or tight spaces in real estate?
To capture high-quality images of small or tight spaces, it’s essential to optimize your camera settings for clarity and lighting. Start by using a wide-angle lens (e.g., 16-24mm) to make the space appear larger and capture more of the room. Set your ISO to 100-400 to minimize noise, and use a small aperture (f/8 to f/11) for sharpness and depth of field. Adjust your shutter speed to balance the exposure, especially if you’re working with natural or artificial light.
For best results, use a tripod to stabilize your camera and avoid motion blur. If lighting is uneven, consider bracketing your shots for HDR photography, which combines multiple exposures into one balanced image. This technique is particularly helpful in tight spaces with varying light conditions.