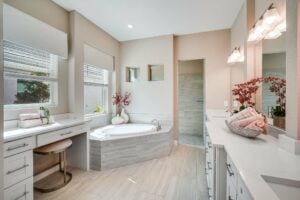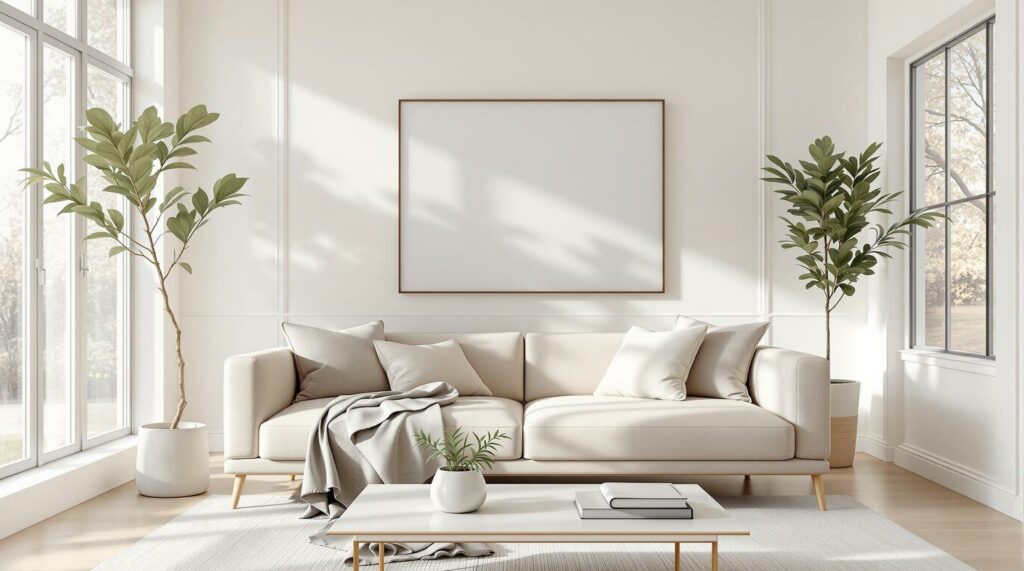
Want to take stunning interior photos with perfect lighting? Bracketing is your answer. It’s a photography technique where you capture multiple shots of the same scene at different exposures, then combine them into one balanced image. This is especially useful for real estate photography, where you need to show both bright windows and shadowy interiors clearly.
Here’s what you’ll learn in this guide:
- What is bracketing? A method to capture a wide range of light by taking multiple exposures.
- Why it matters: Essential for real estate photos to balance bright and dark areas.
- What you need: A DSLR or mirrorless camera, wide-angle lens, tripod, and optional tools like a remote shutter release.
- How to do it: Adjust your camera settings, take multiple exposures, and merge them into an HDR image using software like Lightroom or Photomatix.
- Pro tips: Use a histogram to check exposure, avoid reflections in mirrors, and ensure your camera stays steady on a tripod.
If you’re short on time or equipment, outsourcing to professional services like HomeJab can save time and deliver polished results.
Quick Overview:
| Step | Key Actions |
|---|---|
| Setup | Use a tripod, wide-angle lens, and set your camera to manual or aperture priority mode. |
| Capture | Take 3-5 bracketed shots with varying shutter speeds to cover all light levels. |
| Post-Process | Merge exposures into HDR using software like Lightroom or Photomatix for a balanced image. |
This guide will walk you through everything you need to know – from setup to editing – so you can create professional-quality interior photos.
Setting Up Your Equipment
Required Photography Gear
For high-quality interior photography, a DSLR or mirrorless camera is your best bet. These cameras not only deliver excellent image quality but also allow you to swap lenses based on your needs. A wide-angle lens with a focal range of 12mm to 24mm (on a full-frame camera) is ideal for capturing most of a room in one shot. Some popular choices include the Canon 10–22mm lens, priced around $649, and the Canon 17–40mm lens, which costs about $839. If you’re deciding between lens types, zoom lenses give you more flexibility compared to primes.
Next on your list should be a tripod. Interiors often require longer shutter speeds to properly expose darker areas, and a tripod ensures your camera stays steady. HDRsoft.com emphasizes the importance of using one:
"It is always best to use a tripod whenever possible. You will use long shutter speeds to expose the dark areas of the room, and the overexposed photos will be blurry if you take them hand-held."
For tripods, consider the Manfrotto 190XPRO3 legs, which are priced at about $109.95, paired with the Manfrotto 322RC2 Joystick Head for $144.47. If you’re on a tighter budget, the ePhoto 717AH Fluid Head costs around $72.89. While carbon fiber tripods are lighter than aluminum ones, they also tend to be more expensive.
A remote shutter release can also be a game-changer, especially if your camera doesn’t have Auto Exposure Bracketing (AEB). Even if AEB is available, a remote release reduces vibrations caused by pressing the shutter button. Many newer cameras even allow you to use a smartphone app for this purpose.
Other useful tools include LED panels or speedlights to brighten your scene, a gray card for setting accurate white balance when dealing with mixed lighting, and gaffer tape for tasks like securing curtains or marking tripod positions.
Best Camera Settings
Mastering the relationship between aperture, shutter speed, and ISO is essential for controlling exposure, particularly when bracketing. In most cases, adjusting the shutter speed is the simplest approach – especially if your subjects are stationary and you’re using a tripod.
For consistent results, use either aperture priority or manual mode with a fixed ISO. This ensures your depth of field and image quality remain steady. Always shoot in RAW format for maximum flexibility in post-processing, and set your white balance to a preset instead of relying on auto settings. When using exposure compensation, adjust in 1- or 2-stop increments to capture the full range of light in your scene. Before proceeding, take test shots to confirm your settings are dialed in.
Test Shots and Setup
Start by evaluating the lighting and dynamic range to determine how many exposures you’ll need and the range they should cover.
Use your camera’s histogram to guide your setup. Photographer Mike Smith explains:
"If the histogram looks like a halfpipe, with peaks at each side, then I’ll bracket."
This pattern often indicates a scene with both very bright and very dark areas, exceeding your camera’s dynamic range.
Take spot metering measurements of the brightest and darkest parts of the room to calculate the difference in light stops. Tools like the Sekonic spot meter are handy for measuring the EV range and categorizing scenes based on lighting and contrast.
When reviewing your test shots, check the histogram at both extremes. In the darkest exposure, highlights should remain intact, while in the brightest exposure, shadow details should still be visible. For added flexibility during editing, bracket slightly beyond the expected range.
In some cases, you can address dynamic range challenges by tweaking your composition. For example, reframing to exclude overly bright windows or very dark corners – if they don’t add value to the shot – can reduce the need for extensive bracketing.
Taking Bracketed Interior Photos
Positioning and Framing Your Shot
To get the best results when photographing interiors, start by placing your camera at waist level or about halfway between the ceiling and floor. Use a bubble level on your tripod or a small hotshoe bubble level to ensure the camera’s grid stays parallel to the walls. This helps maintain a balanced and natural perspective. Shooting from the corners of a room or just outside the entrance often works well, but avoid "almost" corner positions, as they can create awkward viewing angles.
Begin with a wide-angle lens, ideally around 24mm, to capture the entire room in one shot. Walk around the space and use your viewfinder or live view to find the angle that best represents the room’s layout and design. Pay attention to alignment – misaligned or overlapping elements can make the shot feel cluttered. Shoot in both landscape and portrait orientations to give yourself more options during editing. Remember, interior photography is about showcasing design, not necessarily the size of the space. Use furniture, walls, and architectural features to guide the viewer’s eye. Symmetry and negative space can also enhance the composition. Once you’re happy with the framing, you’re ready to start capturing bracketed exposures.
Taking Multiple Exposures
With your composition set, the next step is to capture a range of exposures. Set your camera to f/8 for sharpness and use ISO 400 or lower to minimize noise. Adjust only the shutter speed across five bracketed shots to cover the full range of light in the scene – from shadows to highlights. This approach maintains a consistent depth of field while capturing all the details.
You can use Auto Exposure Bracketing (AEB) in manual mode to quickly take the series of shots, or you can manually adjust the shutter speed for more control. Reduce the exposure by 1 EV (exposure value) between each shot. Start with the fastest shutter speed and decrease it incrementally until you reach the slowest speed. This method ensures you capture the full dynamic range, which is especially important for interiors with high contrast lighting.
Solving Common Problems
Even with careful preparation, interior bracketing can present a few challenges. To preserve details in both the brightest and darkest areas, keep an eye on your histogram and use spot metering to address tricky lighting, like window glare or blown-out highlights.
Ghosting or blurring can occur if objects move between exposures. To avoid this, close windows to prevent curtains from fluttering, and ask any people in the room to stay still or step out of the frame. A stable tripod is essential to prevent camera movement, which can also lead to ghosting.
Reflections from mirrors, glass surfaces, or shiny appliances can create distracting hot spots. Adjust your shooting angle or position yourself to block reflections without entering the frame. Mixed lighting from windows and interior lamps can cause color temperature inconsistencies. Turning on all interior lights can help balance the scene and naturally fill in shadows.
In post-processing, use software with automatic alignment features to correct any slight shifts between shots. HDR programs are particularly useful for tripod-mounted sequences and offer tools to tone map your images carefully. This will help you avoid overblended or unnatural results.
The secret to successful interior bracketing lies in preparation and consistency. Take the time to set up properly, keep your camera steady, and follow a methodical approach to capture every detail. These steps will help you tackle even the most challenging lighting conditions with confidence.
Processing and HDR Merging
HDR Merging Basics
Combining your bracketed exposures into a single HDR image can bring out hidden details in both the shadows and highlights, creating a balanced and visually appealing result.
"For best HDR merge, the aim is to capture photos in a manner that each part of the scene is well-exposed, that is neither blown-out nor under-exposed in at least one of the photos."
- Rikk Flohr, Software Quality Engineer for Lightroom ecosystem of apps, Adobe
Adobe Lightroom Classic makes this process straightforward. Simply select your bracketed shots, then go to Photo > Photo Merge > HDR. In the HDR Merge Preview dialog, you’ll find tools like Auto Align, which is especially useful for handheld shots, and Auto Tone, which provides a quick starting point for adjustments. The deghosting feature is another handy tool for handling movement in your shots, such as swaying curtains or people walking through the frame. Start with the Low setting and increase it only if needed.
The number of exposures required for a good HDR merge depends on your camera’s bracket settings:
| Camera Bracket Settings | Optimum Number of Exposures |
|---|---|
| -1.5 to +1.5 | 2 |
| -3.0 to +3.0 | 3 |
| -4.5 to +4.5 | 4 |
| -6.0 to +6.0 | 5 |
For scenes with less than 3.0 stops of exposure difference, such as many interior shots, you might save time by merging just the darkest and brightest exposures. Once merged, the HDR image is saved as a DNG file, which you can edit like any other RAW file.
Improving the Final Image
After the merge, fine-tuning is where the magic happens. Adjust the white balance to ensure natural tones, refine shadows and highlights to balance the light, and apply sharpening and noise reduction carefully to preserve details without introducing unwanted artifacts. Tone mapping can also help compress the dynamic range while maintaining texture and depth. Experimenting with different tone-mapping styles can help you find the look that best fits your image.
Software and Tools
Your choice of software plays a big role in both the efficiency of your workflow and the quality of your results. Adobe Lightroom Classic is a favorite among photographers for its seamless HDR merge tool and robust RAW editing features.
For those managing large batches of photos, Photomatix Pro stands out. It offers advanced deghosting and HDR processing, making it ideal for high-volume editing. As real estate photography instructor Rob Moroto explains:
"Our workflow, using Photomatix, allows us to process 100 photos in less than an hour with complete color and lighting accuracy. No need to pay foreign editors, you can do it all yourself with ease, saving you money and headache."
Luminar Neo brings AI-powered HDR merging to the table and can even create HDR effects from a single photo, which is great when bracketed shots aren’t an option. For those on a budget, EasyHDR delivers reliable results with user-friendly presets and batch processing. Meanwhile, ON1 Photo RAW 2025 offers an all-in-one editing solution without requiring a subscription.
When handling large volumes of interior photos, batch processing ensures consistency across images. Creating presets for common lighting conditions can save time and simplify your workflow. However, it’s crucial to avoid over-editing. As professional photographer Matias Galeano advises:
"Less is more. A lot of beginners go through what’s known as the HDR phase, where the unique/odd look of overly edited HDR images makes them think it’s a stylized aesthetic that helps their images pop. Unfortunately for most people, the hyper HDR look simply isn’t great to look at."
The goal is to produce natural, inviting images that reflect how interiors appear to the human eye – true to life, with accurate colors and details. Once your images are polished, you can explore additional tools or services to refine your HDR photography workflow even further.
sbb-itb-82c5f45
Using Professional Services for Bracketing
Why Use a Professional Photography Service?
Learning to bracket and process HDR images on your own can be satisfying, but there are undeniable perks to hiring professional services for real estate photography. For instance, listings featuring professional photos sell 32% faster, and agents using such images earn double the average gross commission income compared to those who don’t.
Professional photographers bring more than just technical skills. As Harry Lim, a seasoned real estate photographer, puts it:
"Right when you get on a site like Zillow, your eye is drawn to houses with professional photography. They’re brighter, and they just draw you in".
This visual edge directly impacts business outcomes, with listings closing for $934 to $116,076 more than similar properties with lower-quality images.
Additionally, professional services ensure consistency across your listings – critical for building a strong, trustworthy brand. High-quality, uniform photography signals to potential clients that you’re serious and detail-oriented in your approach to real estate marketing. These benefits set the stage for specialized services like those offered by HomeJab.
HomeJab‘s HDR Photography Solutions
HomeJab takes these advantages further with HDR photography services tailored specifically for real estate professionals. Their quick turnaround – delivering media within 24 hours of the appointment – helps you get your listings to market faster. With an impressive 4.8/5 rating from 936 reviews, HomeJab is known for producing sharp, detailed images.
Their HDR photography packages are designed to suit various property sizes and budgets:
| Package Size | Price | Best For |
|---|---|---|
| 15 HDR Photos | $229 | Condos and smaller homes |
| 30 HDR Photos | $259 | Standard single-family homes |
| 50 HDR Photos | $379 | Large homes and luxury properties |
HomeJab’s HDR techniques capture a wide range of exposure levels, creating images that highlight every detail and closely resemble how the human eye perceives light. They also offer useful add-ons to enhance your listings. For example, virtual staging is available for $50 per photo, and virtual dusk photos cost $40 per photo (included for free with luxury packages). These extras can make a big difference – twilight photography alone can boost click-through rates by up to 300%.
The platform connects you with vetted local photographers who understand the nuances of real estate imagery, ensuring consistent quality and market-specific insights.
When to Consider Outsourcing
Outsourcing photography can be especially beneficial for high-volume projects or properties with challenging lighting conditions, where DIY bracketing might require too much time and expertise. The financial impact of outsourcing is compelling: professional photos can generate up to 118% more online views and help sell listings 50% faster.
For agents lacking the skills, equipment, or time to master DIY techniques, outsourcing eliminates the steep learning curve and upfront costs, delivering results immediately. It’s worth considering outsourcing when you need to maintain a polished, consistent brand image, showcase luxury properties with precision, or focus your time on client relationships instead of technical photography tasks.
Using Exposure Bracketing to Photograph Real Estate Interiors
Conclusion
Effective bracketing is a game-changer when it comes to tackling tricky interior lighting. By mastering this technique, you can take your interior photography to the next level. As Matias Galeano from HCE Visuals explains, "choosing a 5 image bracket over the standard 3… those 2 extra images ensure a more complete spread over the entire light-range, and can often lead to much better results", simplifying the editing process and improving overall outcomes. This method gives you the upper hand in managing lighting challenges, whether it’s dealing with bright windows or shadowy corners.
Bracketing expands the dynamic range of your photos, allowing you to capture both intricate interior details and the view outside the windows with precision. Since digital cameras can’t match the dynamic range of the human eye, bracketing helps bridge that gap, producing images that closely reflect what buyers experience in person.
The benefits for your listings are clear. With 68% of potential buyers saying that high-quality photos make them more likely to visit a property, incorporating bracketing into your workflow can give you a competitive edge.
Whether you choose to refine these skills yourself or partner with professionals like HomeJab, the basics remain the same: use a tripod, select the right exposure range, and avoid overblending. For agents juggling multiple listings or catering to high-end clients, professional HDR services can save time and deliver polished results, allowing you to focus on building client relationships.
Investing in bracketing – either by honing your own expertise or leveraging professional services – can directly enhance your brand’s reputation and boost your success in the competitive real estate market.
FAQs
What are the advantages of using bracketing in real estate photography over single-exposure shots?
Bracketing is a game-changer in real estate photography, especially when you’re faced with tricky lighting situations. By taking multiple shots at different shutter speeds, this technique ensures that both the brightest highlights and the deepest shadows in a scene are captured with clarity. The result? Stunning high dynamic range (HDR) images that feel balanced and natural.
For real estate listings, this approach can make a huge difference. Bracketing allows you to showcase properties with incredible detail, even in rooms where lighting is uneven. The photos come out more vibrant and polished, giving your listings a professional edge that grabs attention and draws in potential buyers. It’s a straightforward yet highly effective way to elevate your property photos and marketing strategy.
How can I make sure my bracketed interior photos have natural and accurate colors during editing?
To get natural and accurate colors in your bracketed interior photos, start with a gray card or color checker during the shoot. This helps you establish a consistent white balance right from the beginning. Once you’re editing, tweak the white balance in your software to remove any unwanted color casts and make the tones appear more lifelike.
When blending exposures for HDR, aim to balance highlights and shadows carefully, ensuring the colors stay true without becoming overly saturated. Pay attention to mixed lighting sources, like daylight and artificial bulbs, and adjust them to create a consistent look across the image. Also, don’t forget to calibrate your monitor regularly – this ensures the colors you’re working with during editing are accurate and reliable.
When should I hire a professional service like HomeJab for interior photography?
Hiring a professional service like HomeJab for interior photography is a smart move when you need to showcase properties with top-notch images that grab buyers’ attention and make your listings stand out. Experts have the skills and equipment to tackle tricky lighting and capture photos that truly emphasize a space’s best features.
Outsourcing this task not only saves you time but also spares you the hassle of dealing with photography equipment or techniques. Plus, high-quality, professionally edited photos can speed up the selling process and even boost a property’s value – making it a worthwhile investment for your real estate marketing efforts.